
It looks like Zentangle in motion, isn't it amazing?!
About a fortnight ago:
Surfing the Internet I suddenly came upon these folding examples for origami from Daniel Piker. Absolutely left-handed for that matter, I looked at them with Zentangle eyes of course!! Wow, could they be deconstructed to make a nice tangle pattern?I began with examining the squares. No continuous lines, no apparent grid.... As you can see, it consists of large squares and small ones, one quarter of the size of the large squares. Well, that made sense!
There was only one thing after I had finished the steps, the pattern looked very empty....
A few days later:
Rick and Maria of Zentangle sent their Newsletter and posted "Grid (Un)locked" on their blog.... Well, that was very interesting, a real eye opener. I realized my new pattern isn't just an ordinary tangle pattern, but could also be used as a new kind of grid!! I immediately used one of the "grid seeds" for my example (J-1, see step 8 below) and doesn't it look nice?Have fun with the grid seeds from Rick and Maria, use your own imagination and don't forget to play with the tangle patterns we normally do in the basic "square" grid: Beelight, Yincut, Emingle, Warble, Stoic/Twile.... You'll be surprised about how BrixBox as your grid makes a difference, it offers many new opportunities!
This is what you have to do:

Step 1: Start with a big square at the centre of the section you want to fill.
Step 2: Add a little square to the bottom right on the outside. Are you a left-handed person? Go for the bottom left! Don't draw the dotted lines, just visualize them in order to determine the size of the squares!
Step 3-4: Turn your tile 90° clockwise, draw another square. Repeat twice. The basic shape is ready.
Step 5: Add more large "boxes", constantly turning your tile.
Step 6: Add more small boxes, also constantly turning the tile.
Step 7: Repeat step 5 and 6 until it is sufficiently.
Step 8: Now fill the boxes with any pattern you like!
Constantly turning your tile may seem a little exaggerated, but you will find that it will make the squares more evenly! If you fully focus on drawing BrixBox this way, you will experience a great feeling of "ZENsation"!
Brixbox works as a tangle pattern if you don't draw the boxes too big. Just add some shade and/or accents with your pen, ready!
Drawing the squares, or boxes, reminded me of brickwork. So I thought it would be a nice pun to call this new pattern "BrixBox". I've never seen this pattern/grid before, am I right?? If I'm wrong, please tell me. Should the name already exist, please do the same.
I'm still working on an example ZIA, which will be included in my next post!
Addition
Posted on June 11, 2013
The example ZIA is ready! It's also my entry to the Diva's Weekly Challenge #122! More about that in my today's post.
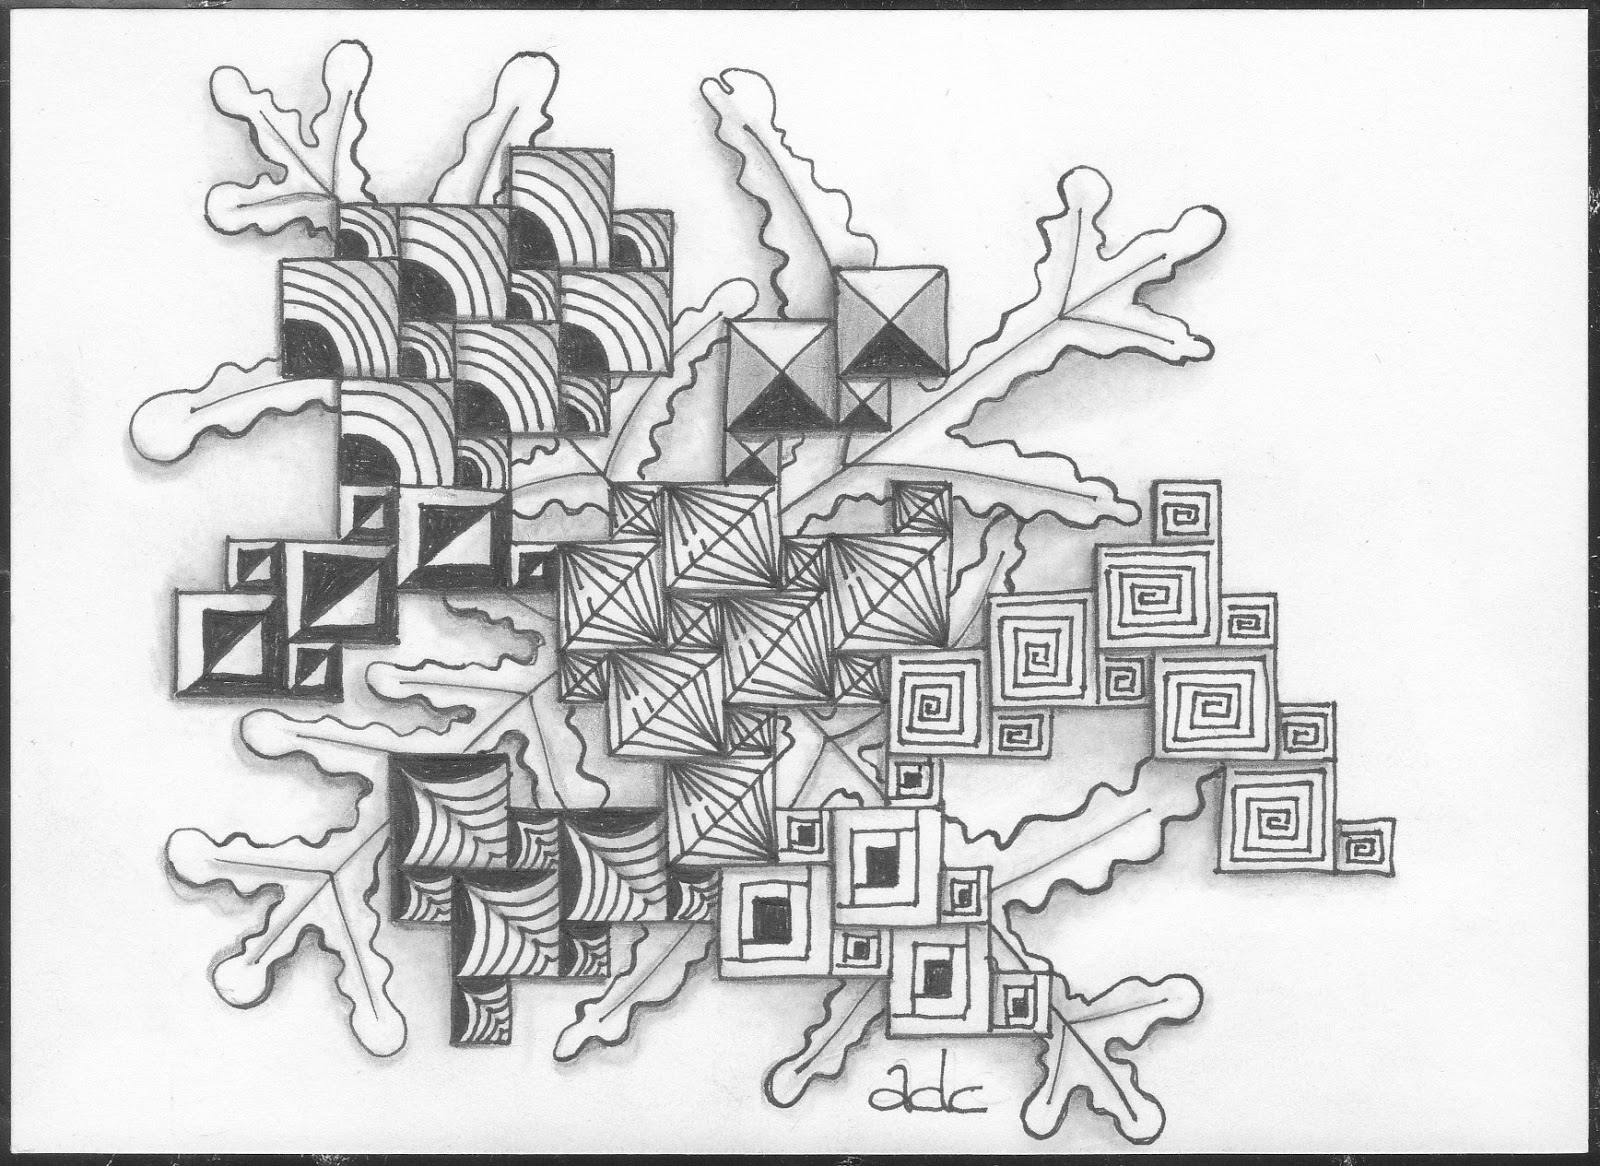 |
| BrixBox used as grid |
Daniel Piker for his stunning Photostream on Flickr;
Rick and Maria from Zentangle® for sharing their knowledge and discoveries;
Rick and Maria from Zentangle® for sharing their knowledge and discoveries;
You for reading this post.... and maybe even for leaving a comment!!!
Happy Tangling everyone!
Happy Tangling everyone!
This looks like a very fun one to play around with! Thank You! KateA.
ReplyDeleteThis looks a great tangle Anneke, one I am going to try something with. You have made the step outs nice and clear as well.
ReplyDeleteI now realise you have called it a grid rather than a tangle. I still think it's great.
Deleteleuk! ga hem meteen vanavond proberen! dank je wel!
ReplyDeletehier is het resultaat.
ReplyDeleteen ik ga hem zeker vaker gebruiken.
http://efie-zentangle.blogspot.nl/2013/06/brick-box-van-anneke.html
Hello Anneke!
ReplyDeleteYour BrixBox looks wonderful and lots of fun! I can't wait to try it out.
Happy Saturday!
Jacque Solomon
www.tanglebright.com
I have worked on this tangle a greater part of the afternoon and I am struggling. I get to step 6 and then I am floundering. I just can't seem to figure out how to continue on after that step! Is anyone else having this problem. I am not a new tangler and don't usually take so long to catch on.
ReplyDeleteAfter studying #6 I follow the square shape from the small red boxes and a large box will fit if you continue with drawing a straight line. I have compared #6 & #7 closely. Take a piece of paper, hold it up to #6 and it becomes clear... Hope this helps. K.
DeleteHi Ginny!
ReplyDeleteI'm sorry to hear you have difficulties with Brixbox! Perhaps these tips will help.
1) Don't try to draw large and small boxes in the same step. In fact there's is a step 7A and a 7B. Step 7A: Only draw large squares, like you did in step 5. 7B: Now only add small squares, like you did in step 6. Repeat 7A+B until you find it's enough.
2) It sounds silly, but it's very useful to keep in mind that the small squares are half as wide and half as high as the large ones. That implicates that the large squares are twice as wide and twice as high as the small ones.
3) In order to experience the structure of this tangle you could practice it a few times on graph paper. I did!!
I hope you won't give up and will try again!
Great idea to practice using graph paper. I would like to use it as a tangle pattern inside itself? Hmmm... I'll practice first and let you know how it comes out!!
ReplyDeleteJudy
Thanks Judy! It seems that you want to use "recursion", here in Holland known as the "Droste effect" (http://en.wikipedia.org/wiki/Droste_effect). I'd love to see this "tangle in a tangle" Zentangle :-)
DeleteAnneke
Love this grid pattern - cant wait to play with it!! Endless possibilities here!
ReplyDeleteSo diff! Love it. (Posting as anonymous as I can't get the others to work. I try, but I do something...um...not quite right...every time.)
ReplyDeleteThank You Anneke, your step outs are so clear and precise I could follow along and it was so much fun to tackle this pattern. I love it.
ReplyDeleteI’ll be using this as a “wacky grid” (hope you are offended since there are several potential ones) in a Reticula and Fragment class in Feb 2023. Thank you for your clever grid!
ReplyDeleteThe comment above is by Gale44@gmail.com (sorry I missed that line. Happy New Year!)
ReplyDelete